I WAS a transplanted California girl who found herself in beautiful Colorado which became 8 of the best years of my life! I'm now back in California, but the name Landlocked Island Girl kind of stuck! I hope you find some inspiration in my work and I'm SO thankful that you've stopped by.
Wednesday, May 16, 2012
Hockey Cake
When my Nephew called and asked me to make him a cake for his 13th Birthday, I should've thought twice when I told him, "Anything you want"......
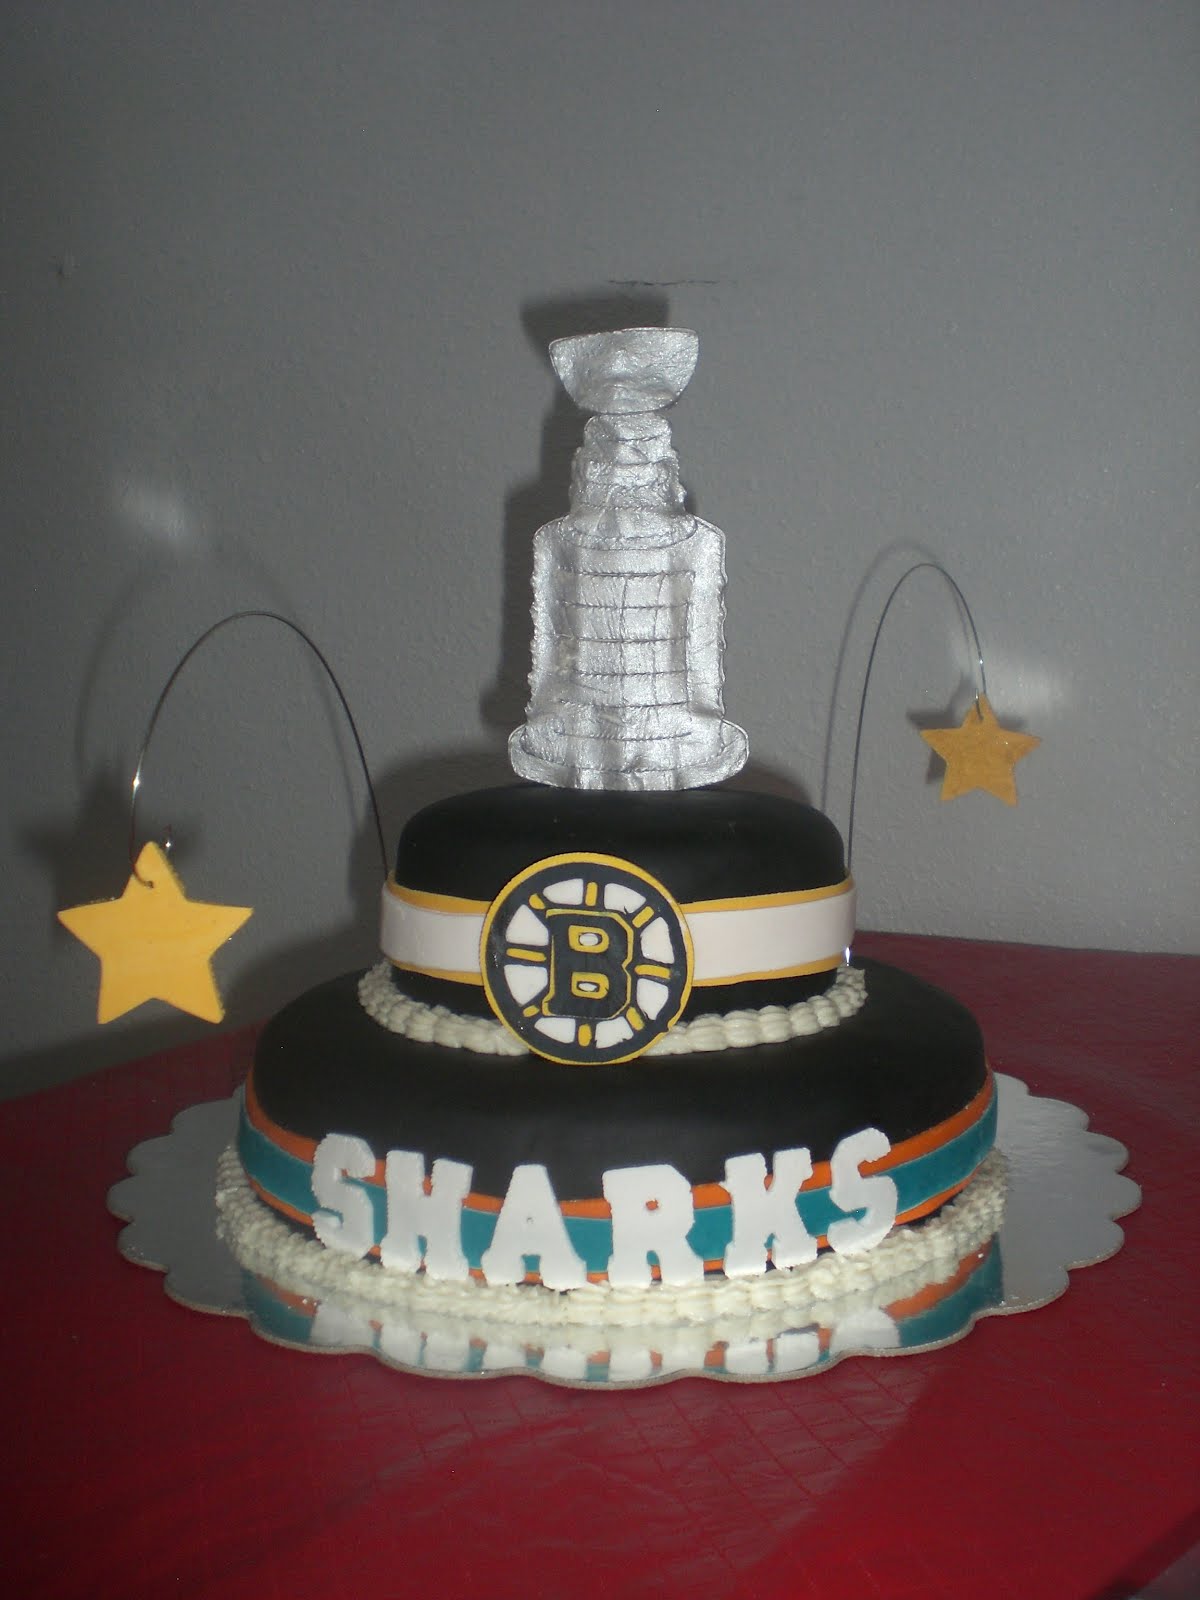
Now, both of my Nephew's are HUGE hockey fans, but Jeremy seems to be a bit torn between his favorite NHL teams. So when he told me, "I want a Boston Bruins and San Jose Sharks cake with the Stanley Cup and Rings that look like Super Hero rings, but with the team emblems on them..." I knew I was in trouble. HOW was I going to incorporate both teams on 1 cake without it looking totally tacky????
Well, here's my attempt.....
I attempted to make each layer resemble hockey pucks, so I covered them with Black Fondant. I have fallen in LOVE with Duff's Fondant. Not only is it easier to work with than Wilton's, the colors are more vibrant and it actually tastes decent. I also used the fondant to stripe the cakes.
I designed the Bruins emblem on MTC and cut it out of Wilton's gumpaste. Tried to use Duff's gumpaste and ended up throwing it in the trash. The Sharks emblem proved too difficult to cut, so I just spelled out Sharks and cut them from the Cricut Varsity Letter cartridge.
Luckily, I found a Stanley Cup SVG and cut it using MTC out of gumpaste. I cut two images, put lollipop sticks between the two, glued them together with liquified gumpaste and painted them with Silver Pearl Dust.
After transporting to the Ice Rink for the party, I placed the Stanley Cup atop the cake and added some cake charms that I hung stars that I cut from gumpaste.
Jeremy was thrilled with the cake....
Tuesday, May 15, 2012
Bruiser's Soccer Treats
It's been forever since I've posted and unfortunately almost as long since I've crafted. It seems now, the only time I can get my creativity on is when a friend or family member has a project for me to help with.
This past weekend, I helped my neighbor and good friend Margie, with an end of season treat for her Daughter's soccer team.
I received a Babycakes cake pop maker from a crafting friend (thanks Amy!), so my neighbor and I had ours working side by side and we turned out over 50 cake pops!
Wait, that sounded way easier than it actually was. Through trial and error, we probably made over 100 pops (some didn't even make them properly out of the pop maker), of those, 56 made it into the buckets. Luckily our Husbands were willing guinea pigs and welcoming recipients of the "rejects".
First we needed a recipe for the balls. We had read that the denser the cake, the better the pop, so we went with our tried and true White Almond Sour Cream Cake recipe. Our first tip with using the pop maker. Don't use Crisco to grease the pop maker, spray with Pam! We wasted 2 batches until we figured that out! We used a pastry bag with a Wilton's 2D tip to fill the pop maker.
We fully filled the bottom cavity. This will create the roundest pop (you'll have some that will come out looking like Saturn, but don't fret. Once you dip it in chocolate, you won't see the ring. If you're really worried about the ring, you can break it off pretty easily.)
We found that baking them for 5 minutes was the perfect time. You'll have to experiment with times based on your maker and the recipe used. When they are done baking you need to put them in the freezer until they are ready to be dipped.
Our first batch, we used chocolate morsels thinned with Crisco and a crock pot. We found the chocolate to cake ratio to be too heavy on the chocolate side (according to Hubby, though. you can never have too much chocolate!). So those hit the reject pile. We weren't too keen on the taste of the Candy Melts but we gave in and found that they worked the best. Make sure you melt the chips in a vessel deep enough to fully submerge the pop into the chocolate.
Again, through trial and error, we found the best method for dipping is to first dip your lollipop stick in the candy melt and immediately poke it into the pop. Fully submerge your pop in the chocolate making sure to coat a small portion of the stick to ensure that your pop stays put! Next, you're going to swirl and tap your pop to get rid of the excess chocolate and ensure a nice round shape. Immediately dip or sprinkle your pop with colored sugars on nonpareil's and let dry on a cake pop stand or we used a piece of styrofoam covered in aluminum foil.
My friend bought the galvanized buckets in the Dollar section of our local Target. We decorated them with vinyl diecuts that we cut on the Cricut. The soccer ball is from Sports Mania cut at 2 inches. The font is Don Juan cut at 1 1/2 inches.
Once the pops are dry (we waited about 30 minutes) we wrapped them in Wilton's Pop Favor Bags. We took the styrofoam circles that we used to dry the pops on and cut them to fit snugly into the bottom of each pail. We carefully pushed the pops into the styrofoam and filled the buckets with green shredded paper and added chocolate soccer balls that were purchased from Rocky Mountain Chocolate Factory.
Here's the finished project! I hear the girls were thrilled with their treats....it made it worth all of the hard work!
GO BRUISER'S!!!!!
Saturday, January 28, 2012
Greetings from Bikini Bottom
Don't let it be said that I won't rise to a challenge........with that being said, I also am notorious for biting off far more than I can chew!
Cricutmachine.com was running a Black Friday special (have I mentioned that I'm a sucker for a good Black Friday special?)and they were selling the Cricut Cake for $49.95. My intention was to make this a fabulous Christmas gift to a well deserving friend, but another good friend, and an incredible enabler, pointed out that this could be the gift that kept on giving......so I kept it! Not only did I keep it, but upon receiving it, I committed to make the cake for a friends upcoming Baby Shower.
Sooooooooo.....8 weeks, 15 Spongebob episodes, 100 youtube video tutorial hours, 10 trips to JoAnn's, Michael's and Hobby Lobby and 6 trials in my test kitchen later. This is my very first cake!
Now, I really hadn't given much thought to the cake itself. I figured all I needed was to pick a flavor. Boy was I wrong. My first cake was just out of the box. It literally crumbled apart when I attempted to level it. So it was back to the internet (and some more tutorials) where I found designmeacake.com. I made her White Almond Sour Cream Cake and almost fell on the floor when I tasted it. Not only did it taste good, it cut like a dream. My first filling was the Wilton White Decorator Icing, I don't recommend it. It was FAR too sweet and really tasted greasy. So....back to the internet! I settled on a Nutella Buttercream Filling.
Now that I had the cake set.....off to the work on the fun stuff, the decorations!
The theme for the shower was Spongebob Squarepants, so I went to my Spongebob Cartridge and started planning the cuts that I'd be making on my new Cricut Cake!!!!
3 days before the shower, I started making my cake toppers. After watching a few episodes of the cartoon, I decided on an Island scene for the top of the cake. I used gumpaste to make the crab and gumpaste wrapped dowels to make the palm trees. The fronds were cut from the Cricut Life's a Beach cartridge.
The day before the shower I made the cakes, covered them with fondant and cut out all of my pieces on my Cricut Cake.
I arrived a couple of hours before the party and put on the final touches.
The sand on the top is brown sugar and all the pieces were "glued" on with gumpaste dissolved in some water and applied with a paintbrush.
The Mom-to-be seemed to be pleased with my cake. Just gave me the motivation to start planning my next one. Possibly something for Valentines Day???.......
Monday, December 26, 2011
Merry Christmas
This year, I decided to do formal seating for Christmas Dinner, then at the last minute I decided to make little gift boxes for each place setting after I received an email for the cut set for these One-Piece Boxes.
We had a large group, so I had a couple of tables to do.
Here are my faves.....
Formal Dining Room
Nook
I only used 2 of the box types available on the cut set.
Lacy Box ~ This box was the easiest. I only had to mess with the size. SVGcuts recommends cutting at 11.5", but I found that it didn't fit properly on the mat. I decreased the size to 11" and was happy with the size.
Box 3 ~ I printed the paper on my Imagine from the Imagine More cartridge. I had to tweak the orientation of the box on my mat with Make the Cut, because of the pattern on the paper. I cut it at a width of 7.5" and height of 11.25" after turning the box to 90 degrees. I added a couple of punched leaves to the top of the box and black curling and gold ribbon.
Sunday, December 18, 2011
Gift Card Boxes
My nieces and nephews live out of state, so gift cards are usually the easiest thing at Christmas time. I'm not thrilled with just popping them in an envelope, I think every gift should be pretty. These gift card boxes hold a gift card with plenty of room for little goodies! I stuffed mine with Reese's Christmas trees, Snickers toy soldiers, York Peppermint Patties and Hershey's Santas!
They were cut from the Cricut Close to my Heart Art Philosophy cart and Cricut Wild Card.
The boxes were cut at 8 1/2 inches from Art Philosophy. The title frames were also cut from Art Philosophy and should be sized based on how you would like to embellish them. The Merry Christmas title was cut from Wild Card.
The name tags were printed from my computer and embellished with glittered punches and handmade bows secured with brads.
I hope they enjoy receiving them as much as did making them!
Monday, December 12, 2011
Christmas Cards

This year I FINALLY did it! I started my cards in August and got them finished and in the mail last week. I'm usually scurrying to the Post Office on Christmas Eve and calling them "Holiday" Cards.


I LOVE this Tri Fold Shutter Card...it's easy and I think it really makes a statement. The tutorial can be found at Splitcoast Stampers

I used a vintage Christmas Paper Pack and Merry Christmas Sizzix Embossing Folder.

The Christmas tree was cut from the Cricut "Trim the Tree" cartridge. It was cut at 4 1/2 inches. The Garland and Toy Soldier were cut from Cricut "Joys of the Season" cartridge.
Saturday, December 10, 2011
Home for Winter Break


Coming home for Winter Break, Kenji was excited to see that some Holiday traditions don't change even when you go away to College.
He woke up to find his Advent Calendar filled with goodies and awaiting his arrival.
I LOVE this Advent Calender that was made from a kit that was purchased from SVGcuts.com and cut with my Make the Cut software. The papers are from Basic Grey's Figgy Pudding and Fruitcake collections.
Thursday, December 8, 2011
Kimekomi Ornaments

Okay....I guess it's time to take this blog a bit more serious. My crafting pals are putting me to shame!
I participated in 2 ornament exchanges this past weekend and here are my contributions!
When my "Colorado Crafting Circle" suggested we do a handmade ornament swap, I wanted to come with something unique. I scoured the internet and found a great post on youtube which led me to ornamentdesigns.com. This gal's work is magnificent. She uses a Japanese technique called Kimekomi. I KNEW I had to embrace my inner Asian and master this new technique. Well, let's just say it wasn't as easy as she made it look, but after spending a small fortune at Hobby Lobby to complete my project, I was determined to pull up my "big girl panties" and get 'er done!
Ornamentdesigns.com has great instructions (with video) on all her designs. I'll be visiting this site often.
I also invested in a Kimekomi tool at http://www.japanesetemari.com/kk/japanese-kimekomi.html and bought the book, Japanese Kimekomi, Fast, Fun and Fabulous Fabric Handballs by Barbara B. Seuss and Kathleen M. Hewitt for the patterns (trust me, it makes the job SO much easier).
The sequined ornament takes about 24 man-hours to complete, but it's SO worth it! The tucked ornament takes about 4 hours.
Rob wants me to make some for our tree, but in different colors. Not sure that's going to happen this Christmas, but I've got my sequins ordered from www.ccartwright.com and I'll get a jumpstart on next year!
Sunday, September 19, 2010
Boogieboarding!
Friday, September 10, 2010
Rock Princess!
I'm in LOVE with my new Cricut cartridge, Rock Princess!
Lots of layers, and it takes quite a bit of time to assemble, but the final product is SOOOO worth it!
What made this layout so much fun was remembering the blast we had playing Rock Band the night of the party!
I also used ALOT of my scraps on this layout!
Wednesday, September 8, 2010
Scraps, Scraps, Scraps.........
So, I went to find a piece of black cardstock in my scraps and recognized that I have a SERIOUS scrap hoarding issue. So I set forth a new scrapping declaration. I will no longer add to my scrap stash! Trust me, easier said than done.
I worked on a 2 page layout this weekend, so yesterday I took all the scraps and made 10 thank you cards! I was OBSESSED....I even used all the tiny scraps and made a mosaic!
Hopefully I can keep this up, and start to use up some of the scraps I've already accumulated (all 5 boxes of them).
Sunday, September 5, 2010
Having a hard time getting inspired
It's been awhile since I've posted. I've had alot of company at the house and I've done a little traveling, so I'm loaded with a bunch of new pictures (to add to the years that I STILL haven't completed) and I sat down yesterday and stared blankly at cardstock and cartridges and realized that I didn't have ANY new ideas.
So I decided that some scraplifting might get the creative juices flowing. I was able to get one 2 page layout done, but it took 6 hours to complete! 1 hour just picking out the papers (which usually is where I'm the most challenged)!
I tried to sit down and get another layout done today, but STILL cannot find the inspiration.
Rob's leaving in a couple of days (which might explain the funk I'm in), and I'm hoping to get alot of work done on my albums in his absence. At the rate I'm going, I'll be lucky if I finish my Vegas pictures......
Oh well, I'll hit the drawing board again tomorrow morning. Hopefully I'll have better luck!
Wednesday, July 28, 2010
My ever growing Cricut Cart Collection
So.....I have a new addiction. Buying carts on Ebay! I didn't realize how cheap you can get carts there. For a year I have been eyeing the Spongebob Squarepants cart (all those pics of Kenji that I've yet to scrap), but I couldn't bring myself to pay $90 for it, and I NEVER saw it go on sale.
Well Monday I took a look at Ebay and saw that the bidding was in the final 2 minutes, so I put in my max bid of $20, and I actually got it for $14.60 and free shipping! Next, I thought I'd try aquiring Forever Young, and made my max bid of $22.00. I lost a couple of items before I was able to win one for $20.30. Let's just say that I'm hooked. Which led me to my next dilemna.......how to store my every increasing collection.
After my shelves took a tumble this past weekend, I'm using every square centimeter of my closet, so I'm needing to purge and make better use of my space.
I found a great idea on YouTube! So I took a standard shoebox (the booklets fit perfectly), made a cute little bag for my carts from Bags Tags and Boxes cart (shopping bag 3"), designed an index card on Design Studio (George and Basic Shapes) and dusted off my P-touch and made labels.
I made sure to write all the Serial numbers in the booklet (just in case).
I've got my next shoebox ready for all the new carts I'm sure to be buying on Ebay....
Thursday, July 22, 2010
Tri Fold Shutter Card
While checking out some fellow Circlets blogs, I found this awesome Shutter card. We're going to celebrate our neighbor's daughter, Catie's, birthday tomorrow at Dave and Busters, so this find was quite timely.
If you want to make your own check the tutorial out at
http://www.splitcoaststampers.com/resources/tutorials/trishuttercard
Enjoy!
Wednesday, July 21, 2010
In bed with my knee....going stir crazy!!!
I did something to my knee on Monday, so I've spent the last 2 days off of my feet. Not an easy "feat" for me!!!
I finally was able to hobble down to the basement today, only to find that my shelves in my scrap closet had come down with all its contents. Kenji and I spent an hour cleaning and reorganizing. I didn't want my labor to go to waste, so I mustered up the strength to pop out a 4th of July layout using my new Cricut Lite Cart "Block Party". I LOVE this cart...with as much as Rob loves to BBQ, I'll have lots of opportunities to use this cart. Purchasing it was bittersweet for me, since I've NEVER paid full price for a cartridge, but since it's a WalMart exclusive, the chances of it going on sale are slim to none. It could show up on Ebay some day....but who wants to wait!!!
Friday, July 16, 2010
New to all this......
So I joined the Cricut Circle for the exclusive cartridges and found that I'm really enjoying the social aspect of the Circle.
I'm trying to figure all this out, so hopefully you'll have patience and not give up on my feeble attempts at blogging.
I'm also looking at this as a way to jump back into my favorite hobby.
I'm trying to figure all this out, so hopefully you'll have patience and not give up on my feeble attempts at blogging.
I'm also looking at this as a way to jump back into my favorite hobby.
Subscribe to:
Posts (Atom)